Android Tips and Tricks for Developers
Its been quite a while since Tarn Aeluin focused on serious Android development. Now that I’m getting back into it, there are a bunch of Android tips and tricks I’ve forgotten and then new tricks I don’t want to forget. Like Tarn Aeluin’s other posts for PHP, Node.js, Java, etc., we’ll use this post as my reference for all the super-secret stuff that makes development easier.
The use of Android Studio (AS) (2.1.2 at the time of writing) on OS-X (10.11.5 at the time of writing) with Java 1.8.x.x. is the focus of this article. I can’t imagine why anyone would still be using Eclipse at this point…I guess that is tip #1 🙂 Tip #2 is to read up on Java in general on OS-X as well.
Android Tips: Studio Preferences/Settings
Settings and preferences in AS can be a little quirky as with all Jetbrains products. To get into the Settings click on Android Studio on the main menu and then of course click on “Preferences…” (not settings – lol). From now on I will call this “Preferences” .There is a separate group of Settings under the File menu item and in that case they are labeled “Settings…” even though they are very similar or the same as the “Preferences”. In many cases these Settings are for the specific project you have open.
AS default Preferences default to off for auto-import of classes. That’s a pain. To fix this go into the Preferences, 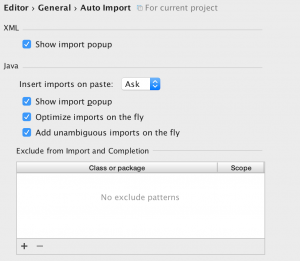 click on Editor, and then Auto-import. Check all the boxes now as you add classes in AS the imports will be automatically updated and optimized.
Code Style and the set of Inspections you want to use are stuffed under the Editor section in both areas of Preferences and Settings. Not sure why Inspections are hidden in there as I don’t associate Lint analysis with the editor in my head.
Android Tips: Code Inspection
Android Studio includes a very robust code inspection tool that includes Lint inspection of Java and Android code. I highly encourage its use on a regular basis. Everytime I write a significant number of lines I run the scanner. Its quick, easy, and can point out some really important things to correct (or improve on) in your code. It is a great way to learn and it is essential in limiting the number of bugs in your code. The Inspection rules are under Preferences or Settings in the Editor section. You can edit them for all projects or just the project that is open.
Android Tips: App Preferences
This can be a bit confusing. Preferences (settings) and how to create them have changed quite a bit over time. There’s a ton of content on the Android developer site, but not a lot of great examples (working sample code) that show the variety of ways you can create and manage preferences. Definitely chekout the dev site and read up. Taking all that in – at the time of writing the best way to move forward is to take a look at the app template (Project –> New –> Settings Activity) that includes a settings activity.
The template implements a AppCompatPreferenceActivity that extends PreferenceActivity. You won’t find any documentation or explanation about this on the Android developer site or much at all in StackOverflow, but if you study this and use it as a pattern it seems to work pretty well and supports phones and tablets. Using this this with Preference headers (sub-pages of settings) that is supported as well and is included in the default template.
If you don’t want the headers, just delete the overloaded method that loads the headers, delete the headers xml file, and then you’ll need to modify the main onCreate() method to load the single page of preferences for you app:
@Override
protected void onCreate(Bundle savedInstanceState) {
    super.onCreate(savedInstanceState);
    GeneralPreferenceFragment preferenceFragment = new GeneralPreferenceFragment();
    this.getFragmentManager().beginTransaction().replace(android.R.id.content, preferenceFragment).commit();
    setupActionBar();

}
The last thing to do is to modify the preference fragment’s onOptionsItemSelected 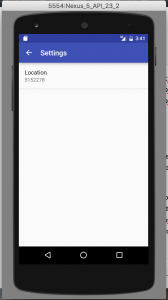 method so that when the home button is clicked it actually fires back up the main activity for your app (call getActivity().onBackPressed()).
A last note, if you are following the design guide for Android, then you should be showing the current setting value in the summary for the setting. See the screen shot to the right. When you want to do this, don’t forget that the findPreference() method call needs the untranslatable string value for the preference from strings.xml and not a key from the .xml file. To get it use this:
bindPreferenceSummaryToValue(findPreference(getString(R.string.pref_location_key)));
Android Tips: Programming
Ok – so how about actual software development tips.
- Logging is your friend! It is so easy to log in Android. Declare a log String like this:
private final String LOG_TAG = MyFragment.class.getSimpleName();
and then use it in the class like this:
Log.v(LOG_TAG, "My log statement: " + "Whatever else I want to say");
- Do not use simple variable names in your methods or overrides, you will regret it later. Even with simple things like
public void onItemClick(AdapterView<?> adapterView, View view, int i, long l)
Having to go back later and figure out what i and l are is a PITA.
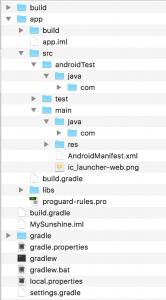
- Android’s file structure is important to understand because its a bit odd. Here’s a typical structure in this
 image of a Finder window of my project. Under the src directory there are several folders for tests, and the main code. In each of these directories there is a code folder that starts in the java directory. Under that will go your classes. The interesting thing here is that if your package namespaces match, then the files will have matching package structures. So what? Well then your tests and classes will be in the same package and that means protected classes can have full access to each other. That makes writing test classes quite a bit easier.
 - Simulator Woes: The simulator has long been a sore spot for Android developers. The iOS simulator has always been better. Lately things are much more even. One of the big problems with the iOS simulator was the need to constantly
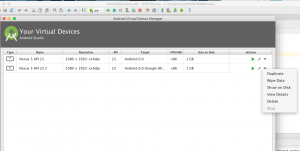
reset it. Now I see this is true in ‘droid-land, today I was scratching my head about why some activities were not working anymore and I couldn’t get a connection to a valid URL. To reset the simulator, open the virtual device manager and then select the down arrow for the virtual device. Wipe Data is what you want to do. All my issues disappeared after doing that.
- Two test folders are created by the new project wizard. What’s the difference? Unit tests that require the Android framework (an emulator) are placed in “androidTests”. These will invoke the emulator to function. Unit tests that do not need the emulator go in “tests” and can be executed without an emulator.
Android Tips: Handy Links
Definitely there are a ton of good android tips on the internet – stack is a huge help, but sometimes its also a PITA since so many answers are out of date. Here’s some links to things that I find helpful – I’ll try to keep this list fresh since I actually will be using these myself.
- https://developer.android.com/guide/components/intents-common.html
- Broadcast Receivers; Manifest vs. Dynamic – decent explanation. Unfortunately there is no single place to look for which intents/events are best used with which style.
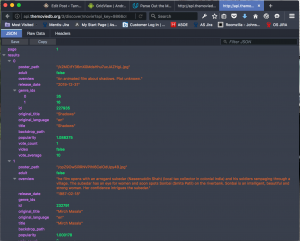
- Yeah I know Chrome is everyone’s fav browser, but Firefox Dev Edition has some cool features, including this cool JSON data browser:

- GUI layout is always the hardest part of any program. Android Studio has several tools buried down deep in its menus to help the GUI designer. Heirarchy Viewer is one of them. To find it – fire up a program in an emulator or attached device. Then Go to tools, Android, and then pick Android Device Monitor. Lots of good stuff in here. However click the “perspectives” button, which looks like this funky thing to the right.
 Select your app in the left hand list of running apps and a big tree display of your GUI broken out by views/layouts appears. You can use this tool to figure out if you have optimization in the layout structure that will increase drawing speed of your GUI. You can also save out tree views for documentation for your boss (if ya got one).

