Exploring Mint with Virtualbox on macOS
Exploring Mint with Virtualbox on macOS is important because my son and I will be traveling to Benin in West Africa later this year with the codetohope project. We’ll be teaching computer fundamentals and programming basics in a variety of classes for both very young students and more advanced college age students. I’ve used the Linux Mint distro in the past, but its been a few years so time to brush up a bit on this distro (V.18.1) and its configuration.
Getting Virtualbox Working with Mint 18.1 on macOS
My machine is a 15″ 2016 MBP with 16 GB of RAM, macOS 10.12.5, and the Radeon Pro card. Plenty capable of hosting a few VMs with Virtualbox. However the installation is not exactly foolproof. Grab the Virtualbox installer, mount the DMG, and do the rest. That’s pretty simple. At the time of writing we’ll be working with V. 5.1.22 and Mint 18.1.
Once you have Virtualbox installed you can add a new VM through the tricky concept of hitting the “New” button. Change the default  Windows selection to Linux and then hmm…pick off “Other Linux (64-bit)”. Mint seems like a pretty big distro to not have choice on the menu, but whatever.
The next choices depend exactly on what you are trying to do. For me I’m just brushing up on the OS. I selected 4 GB of RAM for the OS. I selected to create a Virtual Hard Disk now and set the size to 40 GB. The default value of 8GB will not be enough to actually install Mint into the drive, but you can run it in “preview mode” with just 8GB.
The next step is to download a Mint ISO file – I picked off Mint 18.1 with the Cinnamon desktop. There are several options so I just picked the most popular according to the site. Ya gotta admit that is one minty website 🙂 Cinnamon and Mint do NOT sound like a good combo, but here we go anyway.
So basically this is what I’m going to do in Virtualbox to get Mint working correctly. Startup the machine you created. it will ask for an ISO file so grab the one you downloaded. It will ask to create a virtual drive with 8GB as the default. Increase  this to ~ 40GB. This will startup the image and you should get a running Mint OS. From here its up to you what to do. There will be an install CD on the desktop so I ran than next. Then restart the machine. You will see a message about “running in rendering mode”.
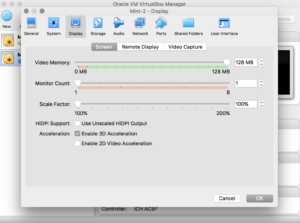
Ok – so there are a few things to do to fix this problem. Once the OS has completed the install shut it down. Right click on the machine and go into Settings. Click on Display. Set the video RAM to 128MB and make sure that 3D acceleration in selected. Now restart the VM – but you will still get this annoying message. We’re going to have to do some work to get the “Guest Additions” stuff  working. Open a Terminal (wooo-hoo!) and we’ll need to remove the pre-installed version of Guest Additions with the following command:
sudo apt-get remove virtualbox-guest-utils
You will need the password for the user you created during the installation of Mint. That will get rid of the currently installed Guest Additions. Now on the main Virtualbox menu select Devices and “Insert Guest Additions CD” and this will auto mount the CD in your Mint OS. In Terminal switch to the CD-ROM drive with the following command:
cd /media/your username/VBOXADDITIONS_5.1.XXXXXX
Obviously insert you username to get to the drive and also just type VBOX tab to get the right location. Once there you’ll need to run this:
sudo ./VBoxLinuxAdditions.run
With that all done restart the VM and all should be good to go! The last thing to do when your machine restarts is to go to Menu and Administration, and the Update Manager and run a complete update on everything. With that all done it seems to work pretty well. One minor complaint already is that in Firefox Mint has removed Google as a search option. Yeah I get the point, but really? Yahoo as the default? Simple to fix in Firefox or just install Chrome. Mint seems to run just great with all this done. Now I’m off to install Android Studio and other goodies.


