Window Builder Pro – A Deeper Dive
Suddenly I find myself thrust back into the Java client-side development space – that’s good timing since recently I had taken a look at Window Builder Pro. Now is my chance to get deep into the tool. I’m going to explore ripping apart an existing client and its model and view – I suppose the controller maybe too. I’m going to look at Swing and JFace capabilities in Window Builder and use this post as an “on-line notes board”.
Setting Up Window Builder Pro
I’ve got a new laptop so the first thing to do is go back and read my previous post and re-do what I did then. With that taken care of I start experimenting with creating different versions of a test app. I made a Swing, an SWT, and a GWT application. One of my requirements is support on Mac, Windows, and Linux. This kind of knocks out SWT in my mind although this might technically not be the case. I looked at the available layout managers for the three widget sets and decided that Swing and GWT had the best choices.
Layout Managers
One of the most important choices in Java development is the layout manager. This component will determine ultimately how your application looks across a variety of machines, operating systems, and screen resolutions. Depending on what exactly you want to do you need to pick carefully.There are a bunch of cool ones, but I don’t have too much time to mess around.
I know that I already like JGoodies forms so I want to try that one. I dug into the code a bit in the sample app and discovered that the default install has JGoodies forms 1.3 when 1.4 is the latest. When you create your project, the wizard will drop out the jars into your project. If you just try and replace the jar with the new one you’ll get compile errors. Here’s how to do it:
- Grab the forms jar from the download site and drop it somewhere in your project’s folder.
- Grab the commons jar from the download site.
- Right click on your project and select properties, then go to java build path
- Select the libraries and then Add Jar – add both Jars – optionally remove the 1.3.0 jar
- Go to the libraries and make sure that the 1.4 forms jar and the commons jar appear above the 1.3.0 jar (unless you removed it).
- Close out of all this crap
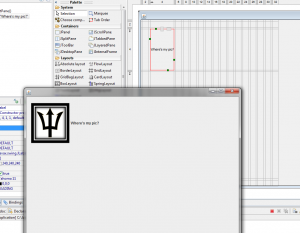
With all that done add a FormLayout manager to your sample app and then drop a few things in it and try to run it. It should work. You will definitely want to play around a bit switching between design view and code view to see how things are working. I’ve also noticed some limitations in the design view – for example if you add  an image to a panel or any other control it does not see to get displayed properly. I’m not sure why – it does display correctly when I run the program. This is a big problem because if you want a graphic – say a logo on a panel mixed with fields then you cannot use the graphical designer interface to do this.
While I was struggling around with this I did notice a lot of features for configuring the grid layout. If you squint and click you will notice that you can bring up property notebooks that allow you to play around with the grid configuration. That really helps quite a bit with tweaking around how things are working. In the image to the right you can see the click regions on top and to the left with the little numbers – click on those things. You can also add rows and columns by right clicking too. Pretty nice
What’s not so nice is that I see to get a lot of parsing exceptions and messed up code from the designer. I’m not sure what the problem is, but I have to keep going back to source view and fixing things like JPanel constructors with messed up parameters. Here’s an example:
panel.setLayout(new FormLayout(new Colu20Spec[] {},
 new RowSpec[] {}));
Where this code should really be this of course:
panel.setLayout(new FormLayout(new ColumnSpec[] {},
 new RowSpec[] {}));
Well – annoying, but easy to fix I guess. If you get an error when trying to show the designer this is probably the cause. So just go to source and fix the problem and hop back to designer view – you may need to hit the “re-parse” button.
Publishing this as a running post…more to come…


