Unblocking the Blockchain – Part 1: Install and Configuration
As with my prior post on graph databases, I have not had a chance to work with blockchain systems. Unblocking the blockchain is what we are up to at House of Beor! Ethereum is interesting vs. other blockchain technologies because of what you can do with Solidity programming and Ethereum virtual machines. This post is part 1 of a series focused on blockchain and application development with a blockchain database. The focus of this article is on basic installation and configuration of Ethereum.
Local Machine Setup
I’ll be using my typical machine for this – which is now up to macOS BigSur 11.6.6. Installing Ethereum on macOS is simple:
brew tap Ethereum/Ethereum
brew install Ethereum
This will install all the Ethereum software including the “geth” CLI that can be used to configure and administer your local blockchain.
For a development environment there are a number of options. Remix, the Ethereum hosted cloud based IDE is a simple choice. You can self host this on macOS and point it at your local install of Ethereum. In addition, another choice is to use VS Code and the Truffle plugin or you could also use the full Truffle Suite including their self-hosted blockchain. We’ll have more on this in Part 2 of this series.
Why Ethereum for a Blockchain?
There are a ton of options out there, but Ethereum is a bit different than Bitcoin. Ethereum can be us a currency exchange. However it can also be used as an application framework where the “currency” is “objects” or “data and methods of access to data, akak business logic”. You can see this in action with non-fungible token (NFT) exchanges. NFTs are not that interesting to me (sorry KFP), but what about exchange of data and logic? Genetic data, personal health data, and clinical data? Could you incent people to contribute data with the outcome of creating interesting sets of data for scientific research?
If we had incentivized putting your COVID-19 vaccine data into an Ethereum blockchain and paid people in ether for access, would more people have been willing to get vax’d? Interesting idea to think about.
Initializing and Starting a Private Blockchain
No better way to learn that doing (“do or do not, there is no try”, right?) , so let’s configure a private blockchain. Following the brew install above, the next step is to configure the “genesis block” –> the first block in your chain. To do this you need a genesis.json file, here’s an example:
{
  "config": {
    "chainId": 9999,
    "homesteadBlock": 0,
    "eip150Block": 0,
    "eip150Hash": "0x0000000000000000000000000000000000000000000000000000000000000000",
    "eip155Block": 0,
    "eip158Block": 0,
    "byzantiumBlock": 0,
    "constantinopleBlock": 0,
    "petersburgBlock": 0,
    "istanbulBlock": 0,
    "ethash": {}
  },
  "nonce": "0x0",
  "timestamp": "0x62272fde",
  "extraData": "0x0000000000000000000000000000000000000000000000000000000000000000",
  "gasLimit": "0x47b760",
  "difficulty": "0x80000",
  "mixHash": "0x0000000000000000000000000000000000000000000000000000000000000000",
  "coinbase": "0x0000000000000000000000000000000000000000",
  "alloc": {  },
  "number": "0x0",
  "gasUsed": "0x0",
  "parentHash": "0x0000000000000000000000000000000000000000000000000000000000000000",
  "baseFeePerGas": null
}
There are a ton of resources on the web to come up with the above. This is a fairly basic config that I combined from a bunch of different examples on github.com and on Stack Overflow. There are no carriage returns on the lines with hex values in that block in case you grab and try to use it.
Initialize the genesis block by placing that json file in the directory where you want this to be installed. CD to that directory and use this command:
geth init ./genesis.json --datadir=./ Then you can use this command (all on one line) to initialize your blockchain and start it up:
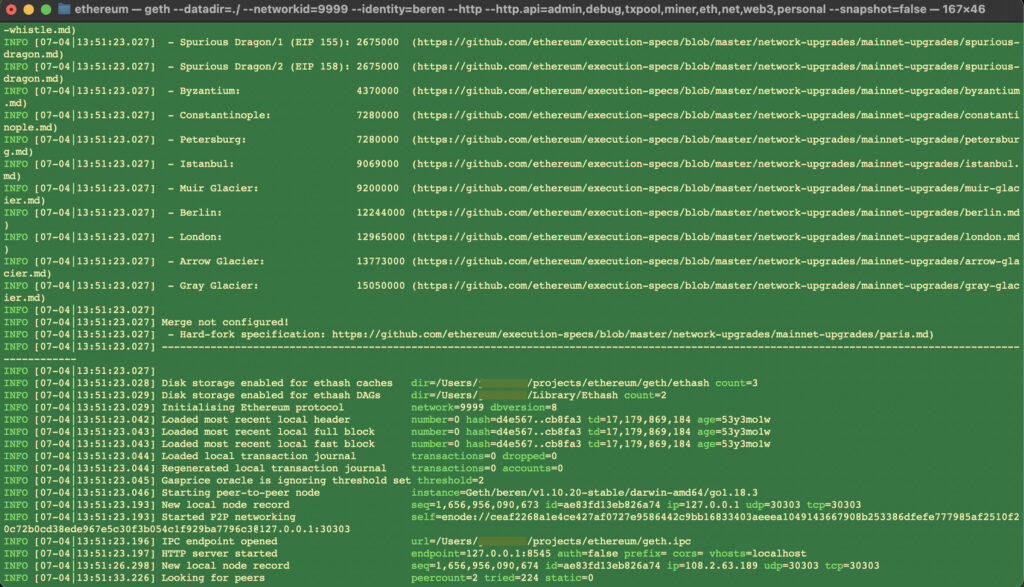
geth --datadir=./ --networkid=9999 --identity="yourID" --http --http.api="admin,debug,txpool,miner,eth,net,web3,personal" --snapshot=falseWith that your blockchain local configuration should boot up as in the screenshot below.

There’s my basic Ethereum private blockchain running and waiting for peers to join! Pretty neat! With this configuration, I have both the IPC and RPC endpoints available for attaching using one of these commands. Open a new terminal and CD to the directory where you initialized Ethereum and use one of the following:
geth attach ./geth.ipc

//or

geth attach http://localhost:8545
I’ll point out now that what I am doing is not meant for production. It is only for basic learning about Ethereum and Solidity development.
At this point you can startup miners and add nodes to your blockchain. Watch out with the miners – that will definitely peg your CPU’s. MacBook Pro fans will kick on in about 30 seconds! lol. Once “the merge” happens and Ethereum switch from PoW to PoS, energy and CPU consumption will drop drastically.
Background Papers, Resources, and Books on Blockchain
- Bitcoin Whitepaper
- Ethereum Whitepaper
- Ethereum Main Wiki
- Ethereum Developers Area
- Introducing Ethereum and Solidity, by Chris Danmen
- Solidity Programming Essentials, by Ritesh Modi
- district0x Understanding Ethereum
- Etherscan
- Metamask
- Remix
- Web3.js
Conclusions – Part 1: Install and Configuration
Ethereum will save the world! Just kidding..installing and configuring Ethereum and getting the basics functioning is straightforward. In the next post in this series I will focus on Solidity programming and the Ethereum virtual machine. I’ll also take a look at Ganache, Truffle, and how MS VS Code fits into the Ethereum world.


