The Facebook SDK for iOS is pretty nice for building social integrations into your apps. In my first post I ran thru the basics of working with the SDK. In this post I will be working with a few of the more advanced features of the SDK like the social graph, handling members and links, and finally personalization features.
You can read Developing iOS Apps with the Facebook SDK – Pt.1.
Working with the XIB Autosizing Component

One thing in XCode that I find confusing is the auto-sizing setup for a widget in the Interface Builder. Let’s take a quick look at this. What I want to do is add a table view component to my screen and then have it fill and size automatically so that the screen is filled. This used to be easy since there was only one screen size, but these days not so much.
So check out that funky widget with the little lines and arrows. Intuitive? Not really. The lines outside the box indicate if the component should expand beyond its original dimension to fill the screen. There’s one control for each side of the component. Turning off a line will also imply that the widget should be aligned to the opposite side sort of.
The lines inside the box – what could they do? These lines determine if the component should always be the width and height as listed in those boxes above, or if the component should shrink to the minimum space required – for example if a table has no data.
What’s the Secret?
I’ve noticed that the Facebook iOS SDK tutorials declare thing private quite a bit in the implementation files rather than using the header files. I’m not sure why they are doing this. Here’s what I mean – for the above table view controller, the tutorial says to list the protocols in the implementation file like so:
@interface SCViewController ()
<UITableViewDataSource,
UITableViewDelegate>
This means they would be private to the implementation file. Why? What’s the secret? I’m not sure. Typically I would put these in the header file and then also add the declaration of methods as well. Good documentation and I can’t think of a reason for making them private. Either way works I suppose – just confusing IMO.
Memory Management
Another area where the Facebook iOS SDK is a bit behind is in memory management. If you have ARC turned on (highly recommended) then you do not and probably should be using viewDidUnload to free up resources since this is deprecated now in iOS6+. If you need to free up something (like an observer) it is better to put this in the dealloc () method. Probably ok to free up delegates and controllers there as well when needed.
Its all in the Details – Facebook iOS SDK

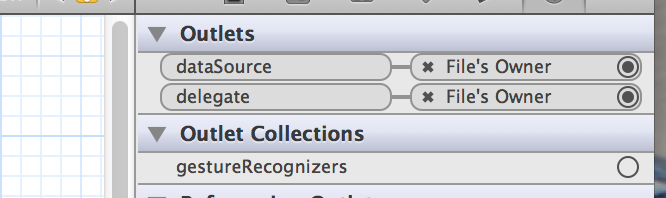
The Facebook tutorial kind of assumes you know what you are doing. “just wire the crap up” and comments like that I’m sure leave many going – uh what????? So – here’s what I suggest. Download the samples – code the app yourself and then use the sample when you get stuck. Here’s a great example from part of the tutorial – this is the spot where you are loading up the table view with your friends. The instructions are to “wire it up” which is ok – but here’s a shot of what this looks like in the IB in case you need a bit of help when your friends list is not not responding.
Dealing with the Location Manager
I’ve worked with the Location Manger in the past. Depending on what you are doing getting this working with no errors or missing locations can be a bit tricky. Of course read the docs from apple, but to me this leaves a lot on the table. The FB tutorial example just kinda shows the basics for how to use the location services. For example the location service starts when the app starts and never shuts off.
- (void)viewDidLoad
 {
   [super viewDidLoad];
   ...
   self.locationManager = [[CLLocationManager alloc] init];
   self.locationManager.delegate = self;
   self.locationManager.desiredAccuracy = kCLLocationAccuracyNearestTenMeters;
   self.locationManager.distanceFilter = 50;
   [self.locationManager startUpdatingLocation];
 }
This will drain the battery bigtime. It would be much better to have the service get a location and then shut down. The trick of course then becomes how to update the service and how to handle timeouts. I’ve tried various ways to do this, but never been entirely satisfied. I’ll have to look around for examples on how to be more efficient. I’ve tried something like this, but it has not proven to be 100% reliable:
- (void)locationManager:(CLLocationManager *)manager didUpdateLocations:(NSArray *)locations
 {
   // If it's a relatively recent event, turn off updates to save power
   bestEffortAtLocation = [locations lastObject];
   NSDate* eventDate = bestEffortAtLocation.timestamp;
   NSTimeInterval howRecent = [eventDate timeIntervalSinceNow];
   NSLog(@"didUpdateLocations - before the howRecent if");
   if (abs(howRecent) < 5.0)
   {
     // If the event is recent, do something with it.
     currentCoordinates = [NSString stringWithFormat:@"currentLocation Lat %+.6f Long: %+.6f",
     bestEffortAtLocation.coordinate.latitude, bestEffortAtLocation.coordinate.longitude];
  }
   geocoder = [[CLGeocoder alloc] init];
   [geocoder reverseGeocodeLocation:bestEffortAtLocation completionHandler:^(NSArray *placemarks,
    NSError *error)
   {
     if (error == nil && [placemarks count] > 0)
     {
       placemark = [placemarks lastObject];
       currentLocation = [self getCreativeLabName:placemark.locality];
       NSLog(@"Found placemarks: %@, error: %@", placemarks, error);
       isLocationGood = YES;
       [self reloadVisitsList];
     }
     else
     {
       NSLog(@"%@", error.debugDescription);
     }
   } ];
 }
The problem with this code is that you don’t always get a location fast enough for a speedy user filling out a form.n Happy to report that the API calls and controllers work very well – no issues, but they do leave the GPS on.
In the Details
During the tutorial I notice that there are a lot of details being skipped over – again I think the assumption is that you are a master iOS developer before you attempt this. What do I mean? For example the done buttons on the pickers – they don’t work since we have not attached them to a function – perhaps we will come back to those later on in the tutorial, but I don’t think so. Another example is the initialization functions for the various views. The code you create in the tutorial is significantly different from what the sample app’s code actually is. For example take a look at the code in SCViewController for the didSelectRowAtIndexPath.
Here’s the code from following the tutorial for the case 1 block:
       case 1:
            if (!self.placePickerController)
            {
                self.placePickerController = [[FBPlacePickerViewController alloc]
                                              initWithNibName:nil bundle:nil];
                self.placePickerController.delegate = self;
                self.placePickerController.title = @"Select a restaurant";
            }
            self.placePickerController.locationCoordinate =
            self.locationManager.location.coordinate;
            self.placePickerController.radiusInMeters = 1000;
            self.placePickerController.resultsLimit = 50;
            self.placePickerController.searchText = @"restaurant";

            [self.placePickerController loadData];
            [self.navigationController pushViewController:self.placePickerController animated:true];
            break;
Now here is the source code for the same block in the app’s actual code:
        case 1: {
            FBPlacePickerViewController *placePicker = [[FBPlacePickerViewController alloc] init];
            placePicker.title = @"Select a restaurant";
            // SIMULATOR BUG:
            // See http://stackoverflow.com/questions/7003155/error-server-did-not-accept-client-registration-68
            // at times the simulator fails to fetch a location; when that happens rather than fetch a
            // a meal near 0,0 -- let's see if we can find something good in Paris
            if (self.placeCacheDescriptor == nil) {
                [self setPlaceCacheDescriptorForCoordinates:CLLocationCoordinate2DMake(48.857875, 2.294635)];
            }

            [placePicker configureUsingCachedDescriptor:self.placeCacheDescriptor];
            [placePicker loadData];
            [placePicker presentModallyFromViewController:self
                                                 animated:YES
                                                  handler:^(FBViewController *sender, BOOL donePressed) {
                                                      if (donePressed) {
                                                          self.selectedPlace = placePicker.selection;
                                                          [self updateSelections];
                                                      }
                                                  }];
            return;
        }
That is quite a bit different. I’ll have to dig through what the differences are and why. Not s simple process to dig thru since even the controller and variable are slightly different so you cannot just cut/paste the code. In general I think working with the Facebook iOS SDK is pretty straightforward, but it does require a pretty big investment in time. If you plan on working with a bunch of social tools then you probably need to place some bets or try out higher level tools like kinvey.com that could speed up the work a bit. Always tradeoffs with those types of tools in terms of features and cost.
For that last code example the difference in the displays basically gets around the button differences I noted. By using a modal controller you change up the interaction model. Not sure I like it either. In the original, the controller for the location is dismissed when you click a location. In the latter code you have to click the done button – but you don’t have the annoying double button. The animation effect is different too with the animation coming from the bottom up instead of left to right and right to left. I’ll continue playing around with it.